イラスト切り抜き マスク作成 (Transparent-Background)
はじめに
Stable DiffusionでLora作成のために、素材をマスキングしたいと思った。
【今回の学習】
- Transparent-Background
参考サイト
切り抜きや背景透過・学習素材集めのお供に最適!Transparent-Backgroundが超高性能なので使ってみよう!ほか拡張機能の紹介【Stable Diffusion】
インストール方法
ダウンロードサイト
plemeri/transparent-background
GitHub - plemeri/transparent-background: This is a background removing tool powered by InSPyReNet (ACCV 2022) · GitHub
This is a background removing tool powered by InSPyReNet (ACCV 2022) - plemeri/transparent-background
インストール方法
コマンドプロンプトで以下の命令をする
※どこでも大丈夫です

以上で終了です!※簡単ですね
使用方法
練習用として、Cドライプに「images」フォルダを作成します。
その下位ファルダに、「sozai」と「output」を作成します。

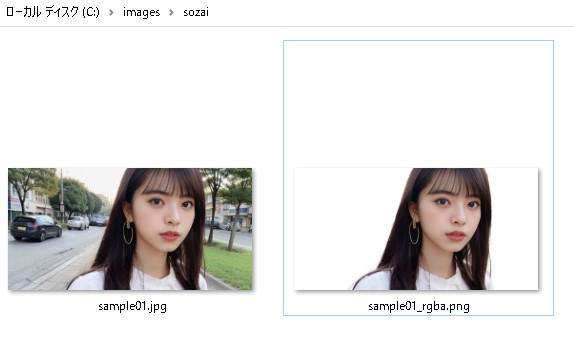
「sozai」フォルダに、「sample01.jpg」を追加しました。

「sozai」フォルダにて、コマンドプロンプトを起動させます。
以下の命令文で、切り抜き画像が作成されます。

今回は、「sozai」フォルダに切り抜かれた画像「sample01_rgba.png」が生成されています。
比較
【元データ画像】

【切り抜かれた画像】

髪の毛などを確認すると、他のアプリと比較しても断然良い生成結果になりました。
応用
マスクを作りたい場合
transparent-background --source sample01.jpg --type map
今回は、「sozai」フォルダにマスク画像「sample01_map.png」が生成されています。

グリーン背景を作りたい場合
transparent-background --source sample01.jpg --type green
ホワイト背景を作りたい場合
transparent-background --source sample01.jpg --type white
目的の画像背景を作りたい場合
「sozai」フォルダに、「back01.jpg」を追加しました。
transparent-background --source sample01.jpg --type back01.jpg
【命令文】

【作成結果】

【背景画像を結合した結果】

バッチファイル作成
フォルダ内のファイルを丸ごと変換するバッチファイルを作成します。
「sozai」フォルダに、「sample01.jpg~」を追加しました。

バッチファイルの作成「setup.bat」
※改行なしの一行で作成します。
transparent-background --source "C:\images\sozai" --type white --dest "C:\images\output"
バッチファイル「setup.bat」をダブルクリックすると、「output」フォルダ内に、人物が切り抜かれた白い背景画像が生成されています。

結論
今まで手作業が多かった切り抜き画像がワンクリックで作成できるようになった。
Lora学習でも有益な活用が出来そうである。