AniPortraitの導入方法と使い方【動画・歌・声に合わせて口パク】
はじめに

動画に合わせて口パクするアプリが登場した。
AniPortrait-for-windows
GitHub - sdbds/AniPortrait-for-windows: AniPortrait: Audio-Driven Synthesis of Photorealistic Portrait Animation · GitHub
AniPortrait: Audio-Driven Synthesis of Photorealistic Portrait Animation - sdbds/AniPortrait-for-windows
参考サイト
AniPortraitの導入
条件
- Python 3.10
- Git
- FFmpeg
Power Shellの設定変更
Power Shellの設定変更:Set-ExecutionPolicy Unrestricted
実行ポリシーの変更:y(はい)
設定確認:Get-ExecutionPolicy
Cドライブに「aniportrait」フォルダを作成
「aniportrait」フォルダ内でターミナルを開く
AniPortrait-for-windowsのインストール

git clone --recurse-submodules https://github.com/sdbds/AniPortrait-for-windows
cd AniPortrait-for-windows
python -m venv venv
.\venv\Scripts\Activate.ps1
.\install.ps1

model select n [y/n]:y
以下のファイルを手動でインストール
ZJYang/AniPortrait at main
We’re on a journey to advance and democratize artificial intelligence through open source and open science.
audio2mesh.pt
denoising_unet.pth
motion_module.pth
pose_guider.pth
reference_unet.pth
以下のようにファイルを配置する

AniPortraitの起動
Power Shell
.\venv\Scripts\Activate.ps1Self driven(顔画像・pose動画→AI動画)
・顔画像

・pose画像

Power Shell
python -m scripts.pose2vid --config ./configs/prompts/animation.yaml -W 512 -H 512 -L 100※100フレームに変更
生成された動画 → AniPortrait-for-windows\output\(日付)
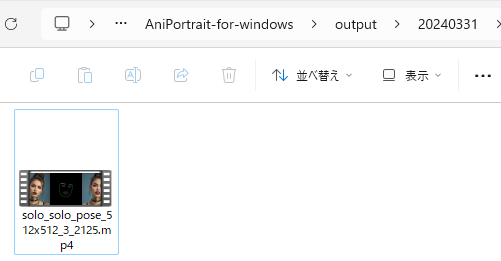
・生成されたAI動画
Face reenacment(顔画像・元動画→AI動画)
・顔画像(Stable Diffusionで生成された顔画像)

・元動画

animation_facereenac.yamlの変更
test_cases:
  "./configs/inference/ref_images/ai01.jpg":
    - "./configs/inference/video/ai01_song.mp4"
Power Shell
python -m scripts.vid2vid --config ./configs/prompts/animation_facereenac.yaml -W 512 -H 512・生成されたAI動画
Audio driven(顔画像・元音源→AI動画)
・顔画像(Stable Diffusionで生成された顔画像)

・元音源 (音読さんで生成)

・animation_audio.yamlの変更
test_cases:
  "./configs/inference/ref_images/ai01.jpg":
    - "./configs/inference/audio/ai01.mp3"
Power Shell
python -m scripts.audio2vid --config ./configs/prompts/animation_audio.yaml -W 512 -H 512・生成されたAI動画
CM完成
CMを制作(パソコン修理のわたなべ)
考察
AniPortraitの生成動画は2・3画面となっていました。
動画編集ソフトを用いて、生成動画を分離することにより、AI動画として編集できた。
編集ソフトなどで、CM動画なども制作できることがわかった。